

一、DeepSeek R1 简介
DeepSeek R1 是一款开源 AI 模型,其性能可与 OpenAI 的 GPT-4 和 Claude 3.5 Sonnet 等顶级模型媲美,尤其在数学、编程和推理等任务上表现出色。最重要的是,它是免费、私密的,可以在本地硬件上离线运行。
DeepSeek R1 提供多个参数规模的版本,从轻量级的 1.5B 参数模型到高性能的 70B 版本。它基于 Qwen 7B 架构的精简优化版本,既保持强大性能,又具备更高的计算效率。
其主要亮点包括:
- 完全开源,可自由使用。
- 支持本地运行,无需依赖云服务器。
- 数据完全可控,确保隐私安全。

二、为什么选择本地部署?
本地运行 AI 模型有以下优势:
- 隐私保障:所有数据均存储在本地,避免敏感信息泄露。
- 零额外成本:DeepSeek R1 免费运行,无需订阅或额外费用。
- 完全控制:可以进行微调和本地优化,无需外部依赖。
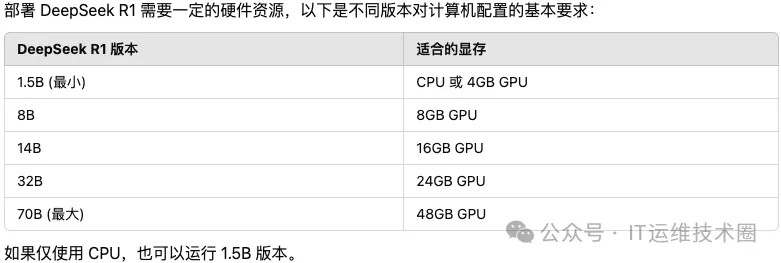
三、硬件要求
四、安装步骤
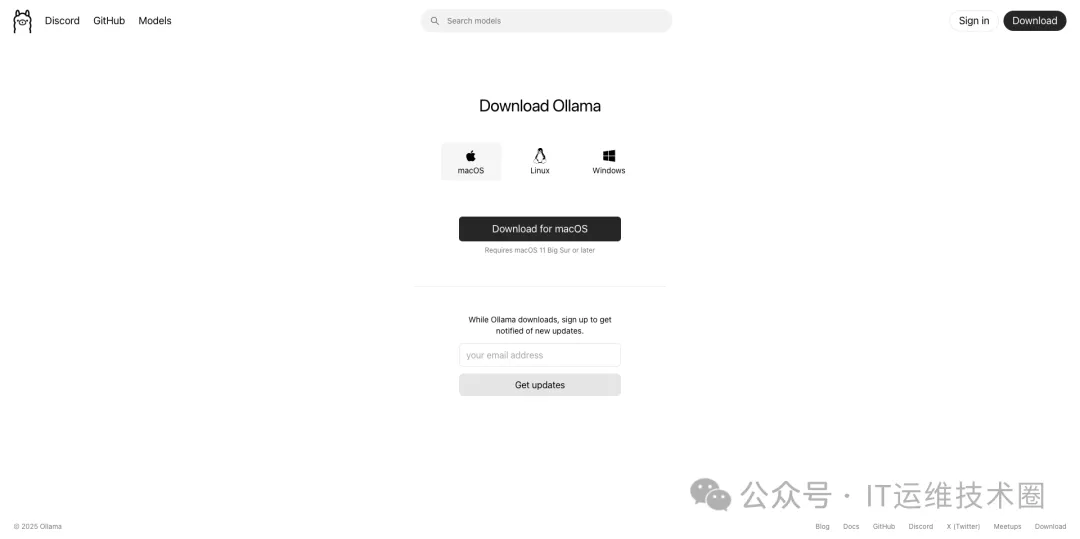
步骤 1:安装 Ollama
Ollama 是一款本地 AI 运行工具,可帮助用户轻松运行 DeepSeek R1。
下载地址:https://ollama.com/download
安装完成后,Ollama 提供了在终端直接运行 AI 模型的功能。
步骤 2:下载 DeepSeek R1 模型
在终端中运行以下命令,根据你的硬件选择合适的模型:
如果你不确定选择哪个版本,可以运行默认指令:
默认情况下,该指令会下载 7B 版本。
模型下载速度取决于网络状况,可能需要几分钟到几十分钟不等。

步骤 3:安装 Chatbox(可选)
为了获得更好的交互体验,可以安装 Chatbox 作为 GUI 界面。
下载地址:https://chatboxai.app/en#
安装完成后,进行以下配置:
- 在“配置 API 模型”选项中选择 Ollama API。
- 设置 API 主机为:http://127.0.0.1:11434
- 选择 DeepSeek R1 作为默认模型。
- 保存设置。
五、功能演示
成功安装后,你可以测试 DeepSeek R1 的能力。例如,让它生成一个用 Python 编写的贪吃蛇游戏代码。
输入 Prompt:
示例代码(优化修正版本):
运行这个程序前需要确保:
- 已安装 Python 环境
- 需要安装 `turtle` 模块(通常 Python 标准库自带)
操作说明:
- W键:向上移动
- S键:向下移动
- A键:向左移动
- D键:向右移动
- 吃到红色食物会增长身体并加分
- 撞到墙壁或自己身体会游戏重置
游戏特点:
- 简单的图形界面
- 分数统计功能
- 碰撞检测
- 蛇身自动增长机制
- 游戏失败重置功能
你可以根据需求进一步添加以下功能:
- 添加开始/暂停按钮
- 增加难度等级
- 记录最高分
- 添加音效
- 设计更复杂的关卡
六、总结
通过本教程,你已经成功在本地部署了 DeepSeek R1,无论你是 AI 爱好者、开发者,还是仅仅对本地 AI 感兴趣,都可以尝试运行并训练自己的专属 AI 资料库。
借助 Ollama 和 Chatbox 等工具,本地运行 AI 变得更加简单和高效。现在就开始探索吧!
文章来自:51CTO